Implementing and deploying a Music Playlist Ruby on Rails app on Heroku
![]()
Today I will show a quick and simple way to build a Ruby on Rails project and deploying to Heroku.
If you haven’t already installed ruby on your device you can install it using rbenv. You can use this for listing all the ruby version available and choose one:
$ rbenv install -l
For this project, we will use the latest Ruby version
$ rbenv install 2.7.1
The first step is to ensure you have Ruby and Rails installed on your machine. You can check that using these commands:
- For Ruby
$ ruby -v
- For Rails
$ rails -v
After you have everything installed, create a new Ruby on Rails project using the following command:
$ rails new [project-name] -d postgresqlFor this tutorial I will name the project “playlist-project”, so I will use this command to generate the rails project:
$ rails new playlist-project -d postgresqlThe last part of the command, “-d postgresql” is for installing PostgreSQL. We use this database because is scalable, runs as a service and it fits much better with Heroku. By default Ruby on Rails uses sqlite3 database, a small database ideal just for development.
After running that command in your terminal, go to the root of your project using:
$ cd playlist-projectBefore you start the server, run this command to create the database:
$ rails db:createAnd that’s it 🚀, you already have a functional Ruby on Rails project that can be viewed on your local machine by running:
$ rails server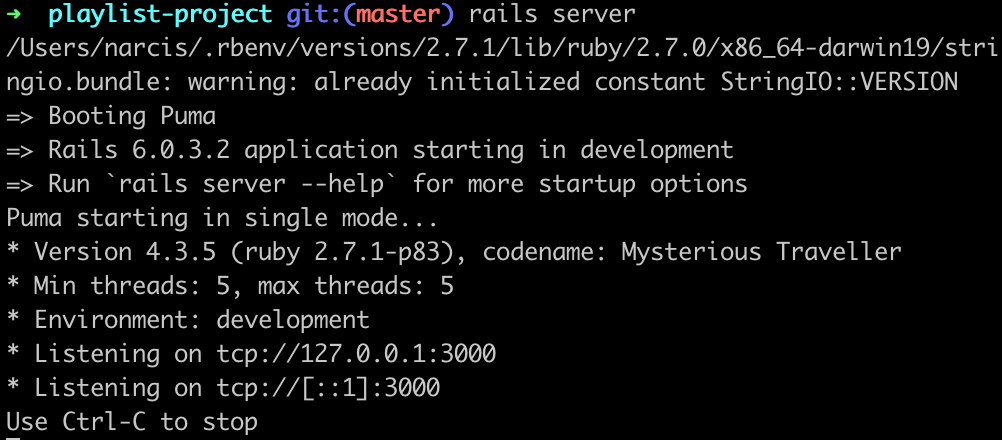 Your server listens to “localhost:3000”, so by accessing that URL on your browser you will see a welcome page generated by rails.
Next, we need a way to create, show, and delete a list of songs or videos for our playlist.
Ruby on Rails is a MVC framework, so to do that first we need to add a new controller to our application using the following command:
$ rails generate controller PlaylistThe methods defined here will be used later in the “View” part of the project.
First, we will create the “new” method:
  def new
  end
The next step is to create a model for our playlist:
$ rails generate model Playlist title:string song_link:stringThis will create a migration for adding a new table in the database with those two attributes and a model.
The model will be used to work with the database, insert, retrieve, or update elements from the database.
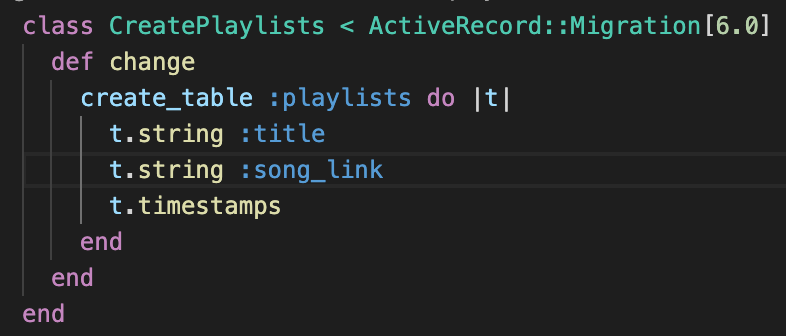
After the migration is created we need to tell the database to load this migration
$ rails db:migrateThe next move is to create a view for that “new” method. In the “app/views” path we can see a directory created by that command used before, named “playlist”. Here we need to create an html file with the name of the method we want to use, like “new.html.erb”.
In this view, we need to create a form for adding new entities for our playlist.
<%= form_with scope: :playlist, url: playlist_index_path, local: true do |form| %>
<p>
<%= form.label :title %><br>
<%= form.text_field :title %>
</p>
<p>
<%= form.label :song_link %><br>
<%= form.text_area :song_link %>
</p>
<p>
<%= form.submit %>
</p>
<% end %>
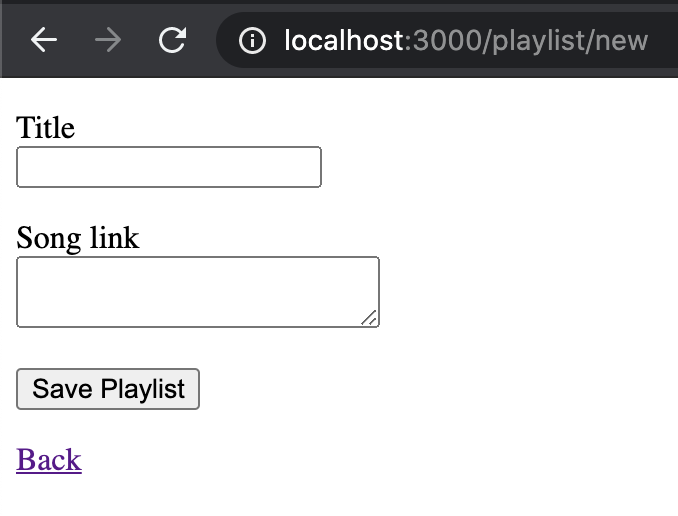
<%= link_to 'Back', playlist_index_path %>And update the “new” method.
  def new
    @playlist = Playlist.new
  end
This is how your “new.html.erb” page looks like:
After this we need to configure a route for our view. To do that we need to go to “config/routes.rb” and use this:
resources :playlistThis will ensure CRUD operations for our playlist, like create, read, update, and delete.
Now we need to add another method in the playlist controller for saving the new entity in the database.
  def create
    @playlist = Playlist.new(playlist_params)

    @playlist.save
    redirect_to @playlist
  end

  private

  def playlist_params
    params.require(:playlist).permit(:title, :song_link)
  end
We will create a new method call “show” to display one record from the playlist.
  def show
    @playlist = Playlist.find(params[:id])
  end
And creating a view file in the “app/views/playlist” path, named “show.html.erb”:
 <p>
  <strong>Title:</strong>
  <%= @playlist.title %>
</p>

<p>
  <strong>Song Link:</strong>
  <a href="<%= @playlist.song_link %>"><%= @playlist.song_link %></a>
</p>

<%= link_to 'Back', playlist_index_path %>
Show page for one of the entities:

The previous method shows only one entity of the playlist, next we need to show all the entities using another method called “index”: “app/controllers/playlist_controller.rb”
  def index
    @playlists = Playlist.all
  end
The most important part after adding a new method to the controller is to create the associated view.
“app/views/playlist/index.html.erb”
<h1>Listing Playlist</h1>
<%= link_to 'New playlist entity', new_playlist_path %>
<table>
  <tr>
    <th>Title</th>
    <th>Options</th>
    <th colspan="3"></th>
  </tr>

  <% @playlists.each do |entity| %>
    <tr>
      <td><%= entity.title %></td>
      <td><%= link_to 'Show', playlist_path(entity) %></td>
    </tr>
  <% end %>
</table>
The index view will be the home page for our app. To do that we need to configure the “root” in the “app/config/routes.rb”:
root 'playlist#index'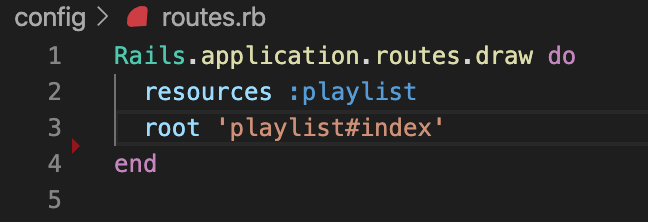
Maybe you want to edit a specific entity of the playlist because of a mistype. To do that, you need to create a new method in the playlist controller to handle this request.
def edit
@playlist = Playlist.find(params[:id])
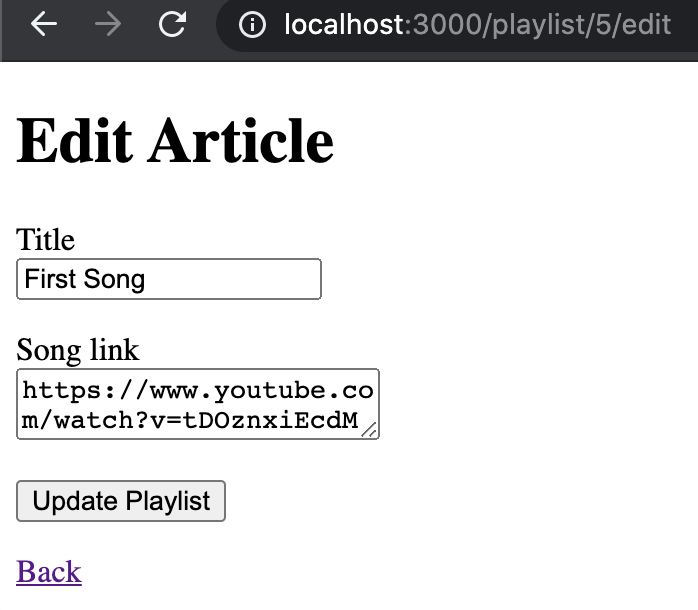
endAnd then, create a new view template: “app/views/playlist/edit.html.erb”
<h1>Edit Article</h1>

<%= form_with(model: @playlist, local: true) do |form| %>
  <p>
    <%= form.label :title %><br>
    <%= form.text_field :title %>
  </p>

  <p>
    <%= form.label :song_link %><br>
    <%= form.text_area :song_link %>
  </p>

  <p>
    <%= form.submit %>
  </p>

<% end %>

<%= link_to 'Back', playlist_index_path %>
This is how “edit” page will look like
It is almost the same with the “new” page:
That it’s not enough for editing an existing playlist entity. We also need an “update” method in our controller. The reason is that the previous “form_with” method point to the update action. In “app/controllers/playlist_controller.rb”
def update
  @playlist = Playlist.find(params[:id])

  if @playlist.update(playlist_params)
    redirect_to @playlist
  else
    render 'edit'
  end
end
To have access to this method, we need to include a link on the “index” page for all of the entities of the playlist. In the “app/views/playlist/index.html.erb” add this:
<table>
  <tr>
    <th>Title</th>
    <th>Song Link</th>
    <th colspan="2"></th>
  </tr>

  <% @playlists.each do |entity| %>
    <tr>
      <td><%= entity.title %></td>
      <td><%= entity.song_link %></td>
      <td><%= link_to 'Show', playlist_path(entity) %></td>
      <td><%= link_to 'Edit', edit_playlist_path(entity) %></td>
    </tr>
  <% end %>
</table>
The last thing that we need for this CRUD application is the delete/destroy method. In “app/controllers/playlist_controller.rb”
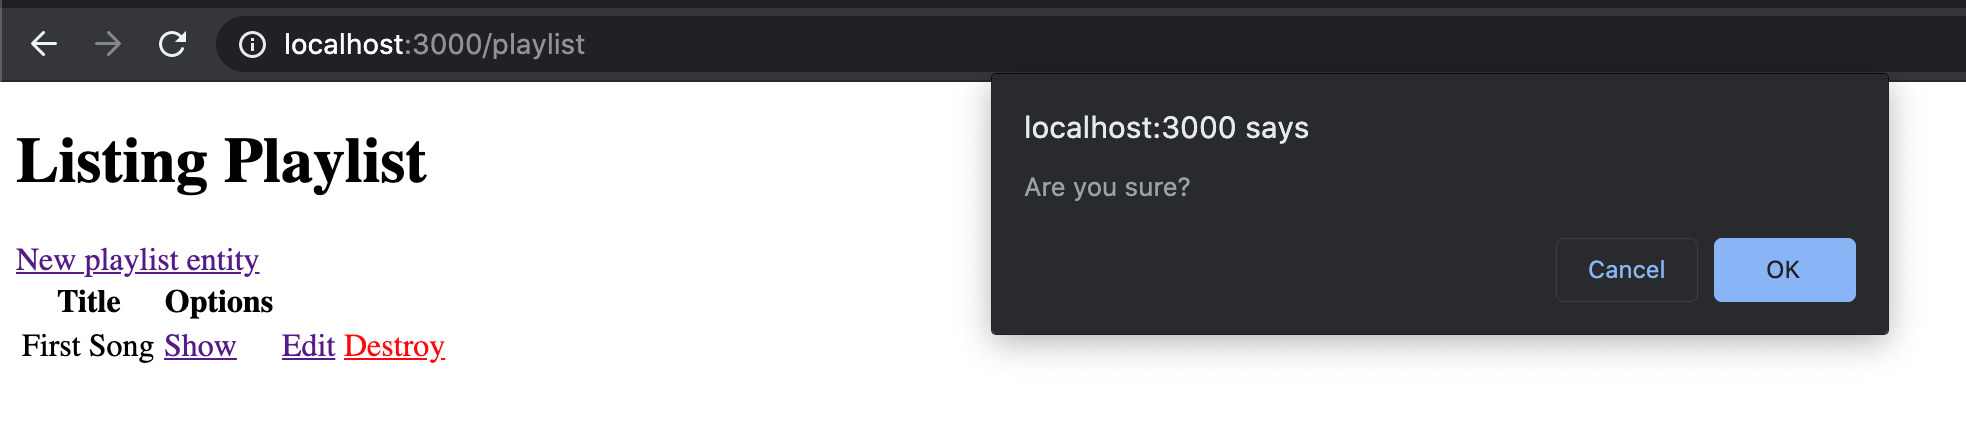
  def destroy
    @playlist = Playlist.find(params[:id])
    @playlist.destroy

    redirect_to playlist_index_path
  end
And after update the “index.html.erb” file:
<h1>Listing Playlist</h1>
<%= link_to 'New playlist entity', new_playlist_path %>
<table>
  <tr>
    <th>Title</th>
    <th>Options</th>
    <th colspan="3"></th>
  </tr>

  <% @playlists.each do |entity| %>
    <tr>
      <td><%= entity.title %></td>
      <td><%= link_to 'Show', playlist_path(entity) %></td>
      <td><%= link_to 'Edit', edit_playlist_path(entity) %></td>
      <td><%= link_to 'Destroy', playlist_path(entity),
              method: :delete,
              data: { confirm: 'Are you sure?' } %></td>
    </tr>
  <% end %>
</table>
When you want to use the “Destroy” method, first you need to confirm that action and only after the entity will be deleted:
Deploying to Heroku
The last step is to deploy our application on Heroku. In order to do that, you need to initialize and add your project to git:
$ git init
$ git add .
$ git commit -m "init"
To create a new Heroku application, run this:
$ heroku createTo upload your newly created project to Heroku, you need to push all your files with:
$ git push heroku masterCreate a new database by running all the migrations to Heroku:
$ heroku run rake db:migrateYou can now visit your app to Heroku dashboard. By pressing the “Open app” button, it will start the application. Or you can start it by using this command from your terminal:
$ heroku openThat’s all, now you have a basic Ruby on Rails project deployed to Heroku. Good job!🚀